Magento:
Magento is the most popular content management system for e-commerce websites. It is used by small businesses and large enterprise companies alike, and can be enhanced by thousands of extensions and themes. Magento uses the MySQL database system, the PHP programming language, and parts of the Zend Framework.
Requirement:
We required a dedicated server atleast 2GB of Ram with Ubuntu 16.04 LTS installed LAMP Stack.
1- Nginx
root@Server16:~# apt install nginx
2- PHP
root@Server16:~# apt install php7.0-fpm
root@Server16:~# apt-get install php7.0-mysql php7.0-zip php7.0-curl php7.0-gd php7.0-intl php-pear php-imagick php7.0-imap php7.0-mcrypt php-memcache php7.0-pspell php7.0-recode php7.0-sqlite3 php7.0-tidy php7.0-xmlrpc php7.0-xsl php7.0-mbstring php-gettext php7.0-soap
3- MySQL
root@Server16:~# apt install mysql-server
Step 1: Download and extract Magento
Download Magento from below mentioned URL:
root@Server16:~# wget https://github.com/OpenMage/magento-mirror/archive/magento-1.9.zip
Use command below to extract zip file
root@Server16:~# unzip -d /var/www/html/ magento-1.9.zip
Where
unzip This is a command
-d Extract file into specific directory
/var/www/html Path where Zip will be extract
Now rename the folder with a simple name using the command below:
root@Server16:~# mv /var/www/html/magento-mirror-magento-1.9/ /var/www/html/magento
Change Permission using command below:
root@Server16:~# chown -R www-data:www-data /var/www/html/magento
Step 2: Create Server Blocks (Virtual Host) and enable it.
Let's configure Nginx Server block using command below:
root@Server16:~# vi /etc/nginx/sites-available/magento.conf
And add the syntax below:
# Default server configuration
#
server {
        listen 80;
        listen [::]:80;

        # SSL configuration
        #
        # listen 443 ssl default_server;
        # listen [::]:443 ssl default_server;
        #
        # Note: You should disable gzip for SSL traffic.
        # See: https://bugs.debian.org/773332
        #
        # Read up on ssl_ciphers to ensure a secure configuration.
        # See: https://bugs.debian.org/765782
        #
        # Self signed certs generated by the ssl-cert package
        # Don't use them in a production server!
        #
        # include snippets/snakeoil.conf;

        root /var/www/html/magento;

        # Add index.php to the list if you are using PHP
        index index.php index.html index.htm index.nginx-debian.html;

        server_name magento.lan;

        location / {
                # First attempt to serve request as file, then
                # as directory, then fall back to displaying a 404.
                try_files $uri $uri/ =404;
        }
 location ~ .php/ {
        rewrite ^(.*.php)/ $1 last;
        }


        # pass the PHP scripts to FastCGI server listening on 127.0.0.1:9000
        #
        location ~ \.php$ {
                include snippets/fastcgi-php.conf;
        #
        #       # With php7.0-cgi alone:
        #       fastcgi_pass 127.0.0.1:9000;
        #       # With php7.0-fpm:
                fastcgi_pass unix:/run/php/php7.0-fpm.sock;
        }

        # deny access to .htaccess files, if Apache's document root
        # concurs with nginx's one
        #
        location ~ /\.ht {
                deny all;
        }
}
Save and Exit from file
Now Create a link of Server blocks using command below:
root@Server16:~# ln -s /etc/nginx/sites-available/magento.conf /etc/nginx/sites-enabled/magento.conf
Check Nginx configuration and restart service:
root@Server16:~# nginx -t
nginx: the configuration file /etc/nginx/nginx.conf syntax is ok
nginx: configuration file /etc/nginx/nginx.conf test is successful
Restart Nginx Using command below
root@Server16:~# systemctl restart nginx.service
Step 3: Create a database and assign permission:
Let's Create a database and assign permission:
Create Database
mysql> create database magento;
Create User
mysql> create user magento@localhost identified by 'magento';
Assign Perrmission
mysql> grant all privileges on magento.* to magento@'localhost' identified by 'magento';
Reload permisson
mysql> flush privileges;
Step 4: Finish Magento Installation
Open browser hit domain name and follow the instruction to finish installation process.
Accept the license agreement

Select Location, TimeZone and Default Currency type

Fill Database Configuration detail, Admin web access URL and session store options

Fill Magento Admin login access details:

All set, after completing all the steps you will get the window like below.
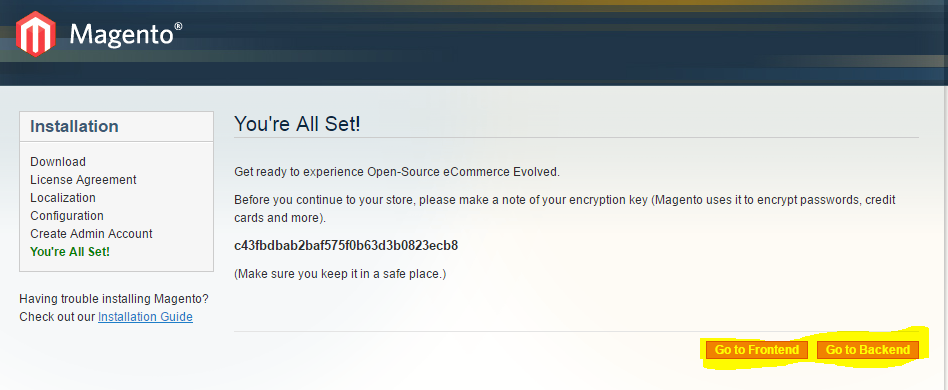
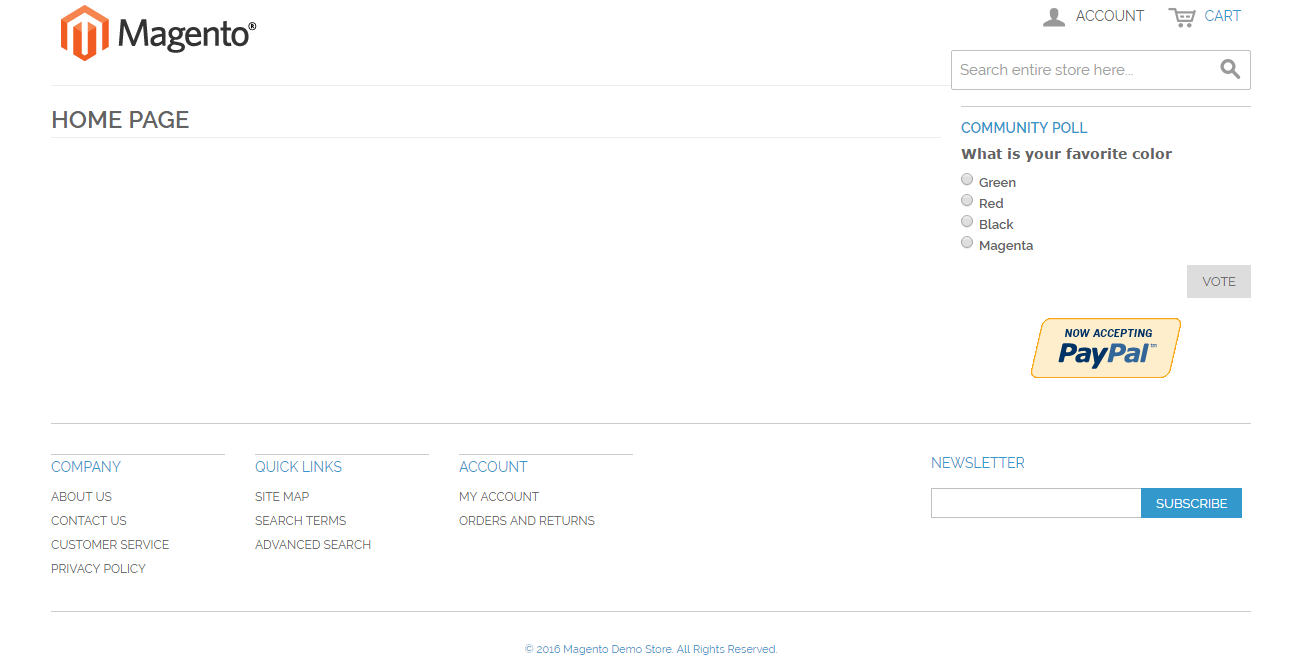
Magento has been installed successfully, Now you can start working with Admin panel using link below
http://magento.lan/index.php/admin/And you Frontend will be looking like this
Hello Amar, I was unable to install and configure Magento with Nginx Ubuntu 16.04 LTS untill I see your blog. Thanks to make this easy by posting each step in comfortable way. I'm working in a Magento eCommerce company and always get updated with these types of blogs to solve my query. Thanks for your efforts.
ReplyDeleteThank you so much for your feedback!
DeleteReally awesome blog. Your blog is really useful for me. Thanks for sharing this informative blog. Keep update your blog. PHP Services
ReplyDeleteEcommerce Service Provider
Data Extraction Services
CRM Services
Bulk Appointments registers