Introduction:- In this my blog series, I'm going to explain a step by step guide to setup SendMail as SMTP relay.
Many websites use simple code to send email from their various website's form. SendMail is one of the utility to use as SMTP relay. Other utilities are PostFix, Exim, SSMTP etc. In this tutorial, I'm using Ubuntu and Sendmail.
 Prerequisites -
 next, we need to create an auth file with the following content. The file can have any name, in this example the name is gmail-auth:
 Do not put the above lines on the top of your Sendmail.mc configuration file!!
In the next step, we will need to re-build sendmail's configuration. To do that execute:
 Step 4- Update your hostname.
In order to faster delivery of the emails, set-up your hostname properly.
First, Check your hostname using command below.
 Modify your Hosts file and add your hostname using this command.

Step 5- Reload sendmail service:
 Check SendMail Service Status, make sure it's up before test the email.

Step 6- Test your SendMail-
Check your Gmail Account Inbox for the new E-mail

Many websites use simple code to send email from their various website's form. SendMail is one of the utility to use as SMTP relay. Other utilities are PostFix, Exim, SSMTP etc. In this tutorial, I'm using Ubuntu and Sendmail.
- A Gmail account with a password
- A User with sudoers access.
Installation -To start the installation and configuration part, SSH your Ubuntu machine.
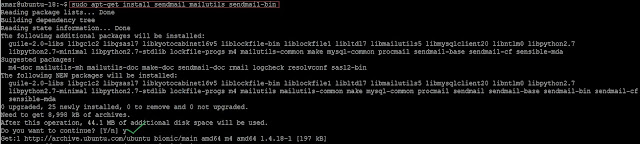
Step 1- Install SendMail & supported components:
To Install SendMail with its components use the following command.
Update your repository first-
# apt-get update
Install SendMail and it's components# apt-get install sendmail mailutils sendmail-bin
Step 2- Create Gmail Authentication file
Create authinfo directory and change the directory using the command below.
# mkdir -m 700 /etc/mail/authinfo/ && cd /etc/mail/authinfo/
# mkdir -m 700 /etc/mail/authinfo/ && cd /etc/mail/authinfo/
Create file-
# vi gmail-auth
Add following line into the file.
AuthInfo: "U:root" "I:myaccount@gmail.com" "P:change-your-pass-here"
Save and Exit from the file.
In the next step we will need to create a hash map for the above authentication file: use the command below# makemap hash gmail-auth < gmail-auth
Step 3- Configure your Sendmail:
Open SendMail configuration file.
# vi /etc/mail/sendmail.mc
Add the following line to it. right above first "MAILER" definition line:
define(`SMART_HOST',`[smtp.gmail.com]')dnl
define(`RELAY_MAILER_ARGS', `TCP $h 587')dnl
define(`ESMTP_MAILER_ARGS', `TCP $h 587')dnl
define(`confAUTH_OPTIONS', `A p')dnl
TRUST_AUTH_MECH(`EXTERNAL DIGEST-MD5 CRAM-MD5 LOGIN PLAIN')dnl
define(`confAUTH_MECHANISMS', `EXTERNAL GSSAPI DIGEST-MD5 CRAM-MD5 LOGIN PLAIN')dnl
FEATURE(`authinfo',`hash -o /etc/mail/authinfo/gmail-auth.db')dnl
Save and Exit from the file, Your Sendmail.mc file should look like below screenshot.
In the next step, we will need to re-build sendmail's configuration. To do that execute:
make -C /etc/mail
In order to faster delivery of the emails, set-up your hostname properly.
First, Check your hostname using command below.
# hostname
# vi /etc/hosts
Append following line on the top127.0.0.1 ubuntu-18.localdomain ubuntu-18
Save and exit from the file, Your file should be like this.Step 5- Reload sendmail service:
/etc/init.d/sendmail reload
Step 6- Test your SendMail-
In order to test your sendmail configuration, let's send a test email.
echo "Testing my sendmail gmail relay" | mail -s "Sendmail gmail Relay" "Amar Singh <amarsingh878@gmail.com>"
Troubleshooting - If anyone having issue while sending email, Please check logs file using the command below.
tail -f /var/log/mail.log
All done you have successfully setup SendMail as SMTP relay using Gmail Account.
!!!Cheers!!
No comments:
Post a Comment